Avoid future cable damage in stud walls
Barry Gregg and Scott Laughlin, Erico Inc.
Problem
Once a cabling installation has been completed and the drywall put up and finished, the end-user moves into the space and begins to hang pictures, put up bulletin boards, and attach coat hooks to the wall. Cables should be installed with foresight to avoid the danger that the nails and screws used for these activities will penetrate low-voltage cabling inside the stud wall.
Solution
When planning your drops to wall outlets, try to run your cables down the center of one side of the stud. This should provide sufficient clearance for any wall penetrations that follow. If the center of the stud is already occupied by other cabling, do not place your cable next to it. To avoid potential electromagnetic interference, use handmade or manufactured hardware to separate the cable run from electrical wiring, but keep the cable centered in the stud.
Procedure
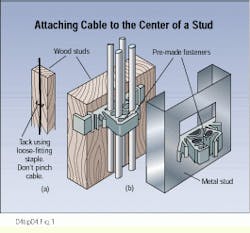
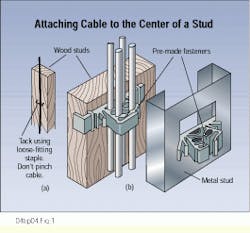
1) Secure the cable run to the center of the stud using staples. Attach them loosely, so that the cable is not pinched (see Fig. 1a). There are also fasteners manufactured for this purpose that attach to either wood or metal studs and that allow for multiple cable runs (see Fig. 1b).
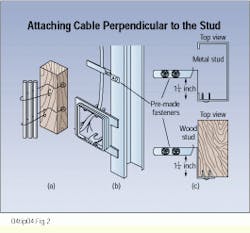
2) If the center of the stud is occupied by another cable, such as a Romex assembly, bend a copper wire around a nail at the face of the stud and position cables in the center of the resulting support, again without pinching the cables (Fig. 2a). In this case also, pre-made fasteners exist for this purpose, and can be used with minimum effort in the field (see Figs. 2b and 2c).
While it may not be mandatory, you should try to apply the principle stated in the National Electrical Code, Article 300-4, "Protection Against Physical Damage." Paragraph 4(d) states: "Cables...parallel to framing members...shall be supported...no less than 11/4 inches from the nearest edge of the framing member where nails or screws are likely to penetrate."
Fig. 1. Loosely tack the cable to the center of a wooden stud (a), or use manufactured wire managers that attach to either wood or metal studs (b).
Fig. 2. Hand-craft a wire manager using a nail and copper wire (a), or use pre-made wire managers available from cabling-hardware manufacturers (b, c).
Barry Gregg is marketing services supervisor and Scott Laughlin is product design specialist, both at the Fastening Products Div. of Erico Inc. (Solon, OH). This tip was entered in the Installer Tips Contest at Cabling Installation Expo `96, held in Charlotte, NC, last October, and was developed for publication by Dennis Mazaris, registered communications distribution designer (rcdd) and principal consultant for PerfectSite, 100 Glenn Drive, Suite A-11, Sterling, VA, 21064 tel: (703) 450-8986, fax: (703) 450-9343, e-mail: [email protected].


