Testing and cleaning parallel optics can present challenges, but port density and a solid high speed migration path make the effort worthwhile.
By Ed Gastle, Viavi Solutions
To accommodate the relentless need for speed, driven by mobile devices, watching videos online and uploading and sharing content, network owners are migrating the physical connectivity in their enterprise and data center environments toward architectures that use parallel optics. Parallel optics accommodate higher data rates and support network migration. Much of the technology to support parallel optics is not new; ribbon fiber and MPO (multifiber push-on/pull-off) connectors have been in use for more than a decade. But the way we are using them has changed. As we get into higher speeds, MPO use is no longer confined to a backbone solution; it is extending into servers and switches, primarily through QSFP ports.
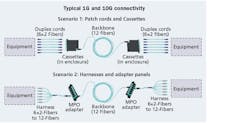
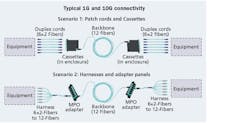
These two scenarios are the most common methods used to achieve 1G and 10G connectivity in today’s networks. Both architectures facilitate a migration path to 40/100G, as they use an MPO backbone.
Let’s look at the client interfaces available today. Right now, the highest speeds we can support are 25 Gbits/sec per lane. To achieve 40G or 100G you must use multiple lanes. This can be accomplished in one of two ways. The first is to use separate fibers (lanes) like you see in PSM4 and SR4 technologies. The other way is to use different wavelengths. There are several solutions that use wavelength division multiplexing over singlemode fiber and it is now possible to support short wave division multiplexing (SWDM) over the new OM5, wideband multimode fiber.
Current architectures
The figure below shows two ways that 1-Gbit and 10-Gbit connectivity are typically achieved in today’s networks.
Scenario 1 shows a 12-fiber MPO backbone cable strung between two racks. At each rack, the cable is connected to cassettes in an enclosure. The cassettes break the 12-fiber MPO in 6 duplex links, which you could use to connect 6 servers from one part of your data center to 6 switch ports at another part of your data center. In an enterprise, this configuration could be used to go from floor to floor where it allows you to run a single cable of 12 fibers, rather than running 6 duplex cables. At the end, the duplex links are broken out on the front of the cassettes for connection to your individual equipment.
Scenario 2 shows the use of harnesses and adapter panels. In this scenario, your last port remains an MPO. For some switches you can buy a harness from a cabling vendor with pre-established lengths.
This allows you to have an MPO adapter in your bulkhead instead of a cassette. The MPO harness plugs into that adapter panel and has 6 individual duplex LC fibers coming off it. If the harness is prewired, it allows you to dress your cable into the rack in a nice, neat way to your active equipment, instead of running 6 individual LC pairs.
Migrating to 40G and 100G
The architectures just described facilitate a migration path from 1/10G to 40/100G, as they use an MPO backbone.
The first step in such a migration is to change one end to connect to equipment (typically a switch) by connecting an MPO equipment cord to a Quad Small Form Factor (QSFP) port. This eliminates the cassette and duplex cords shown in Scenario 1, and the harness shown in Scenario 2.
The “Migrating to 40/100G” figure illustrates such a setup. On the left side, a 12-fiber MPO plugs into a 40G QSFP, which is configured as 4 individual 10G channels instead of one big 40G pipe.
On the right side, it connects either through an adapter with a fanout cable or a cassette and breaks out to four individual servers where each has a 10G connection. The advantages of this architecture is the port density on your switch (one MPO connector is roughly the same size as a duplex LC connector) and an easy migration path to 40/100G. To migrate to a true 40G or 100G system you would replace your fanout cable, or your cassette with duplex fiber, with an MPO adapter panel and MPO equipment cord. Then by reconfiguring the switch you’d be connected throughout the system at 40 or 100G using SR4 technology.
Migrating to 40/100G requires the initial step of changing one end to connect to equipment by connecting an MPO equipment cord to a QSFP port. This eliminates the cassette and duplex cords, or the harnesses.
The optics in the figure are MPO-connected SR4 optics—40GBase-SR4 or 100GBase-SR4. SR stands for short range, and 4 means there are 4 lanes. The lanes are either 10G each (for 40G) or 25G each (for 100G). Each lane is a duplex lane with a fiber for transmit and another fiber for receive. Note that even though it’s a 12-fiber MPO, this setup uses only 8 of the fibers; 4 to transmit and 4 to receive.
Why do these systems use multiple lanes? The goal is to achieve a 40G or 100G connection end-to-end, but it is prohibitively expensive to design optics that can turn on and off 40 billion or 100 billion times per second.
A better solution is to have 4 lasers operating at 10G or 25G, use individual fibers (or wavelengths) and combine them in the optics at the other end. This is like what is done in 1000Base-T, using four pairs of copper and breaking the signal down to 250 Mbits/sec per pair.
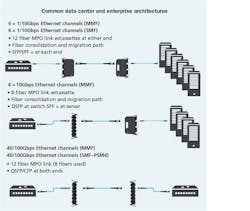
The figure showing three different architectures illustrates the setup described above, and provides examples of some of the most common architectures used in a data center or enterprise environments. The first example is an architecture that has been used for the past 10 to 15 years, and is still a very effective solution. The architecture uses a parallel optics backbone cable with MPO connectors running anywhere from 1G to 10G Ethernet.
Illustrated here are some of the most common architectures used in a data center or enterprise.
The cassettes break down at either end into 6 individual duplex channels. This configuration provides the advantage of fiber consolidation; you’re running a single 12-fiber cable with MPO connectors versus 6 duplex fibers, and it provides a migration path to higher speeds. This scenario takes advantage of all 12 fibers of the MPO connector. Using SFP or SFP+ optics at either end, it supports 6 1G or 10G links over MMF or 6, 1G, 10G, or 40G links over SMF.
The center architecture is one commonly used today. It is an 8-fiber MPO link that supports 4, 10G links over multimode fiber. In this design, the cassette on the left is replaced with an MPO adapter panel. Four 10G channels go to four individual servers with a cassette or fanout cable on the other side. This approach provides fiber consolidation and a migration path, but at the switch end, the MPO provides a single connection into the switch with four times the port capacity as a duplex LC. There is a QSFP port at the switch and SFP+ switches at the server.
The last example shows pure 40G or 100G configuration with end-to-end MPO connectivity. There is an MPO link and an MPO channel with QSFPs or CFPs at either end of that channel.
Standards
Although MPO connectors have been in use for a long time, existing testing standards don’t address MPO-specific test concerns, as they are aimed at testing single or duplex fiber terminated with single fiber ferrule connectors. Those standards are difficult to apply to the testing of ribbon fiber with MPO connectors. In response to the need for standards more applicable to MPO connectors, IEC SC 86C WG1 has released a technical report—IEC 61282-15/TR—on testing multi-fiber-optic cable plant terminated with MPO connectors. We anticipate there will be strong harmonization between the ISO/IEC standards and the TIA standards, which will provide a consistent approach to MPO testing no matter where you are in the world.
When you look inside standards for link and channel testing, they specify two tiers of certification. Tier 1 testing (called “Basic” by the IEC) addresses loss, length, and polarity of installed fiber systems. Tier 2 (called “Extended” by the IEC) is OTDR testing. It’s important to note that the Tier 2/Extended tests are an optional addition to Tier 1/Basic tests, but are never sufficient on their own. Also important is that fiber endface inspection based on IEC 61300-3-35 is a requirement within these standards to ensure the fiber endface is free of debris and defects prior to mating.
Anatomy of an MPO connector
As mentioned earlier, a 12-fiber MPO connector is about the same size as a duplex LC connector, but that’s where the similarities end.
A single-fiber connector contains only one fiber, which sits in a white ceramic ferrule. A multifiber connector uses a polymer ferrule that contains multiple fibers in an array across the middle. There are 4-, 8-, 12-, and 24-fiber MPO variations.
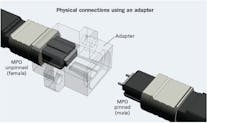
“Gender” also refers to whether a fiber is pinned (male) or unpinned (female). The pins (male) and sockets (female) align the endfaces to ensure the fiber cores are aligned across the connector.
The TIA-568.3 standard provides three methods to configure system to ensure proper connections are made: polarity types A, B, and C.
In addition to gender, MPO cables have specific polarities. Polarity defines how the individual fibers are connected. Polarity is critical as transmitters need to be connected to receivers and vice versa.
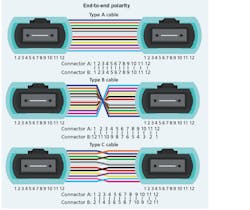
MPO connectors and adapters have keys. These keys are critical to defining the end-to-end polarity of an MPO system. The “Polarity” illustration shows polarity of cables. Pay close attention to the status of the key (up or down) at either end. To make things a little easier, most MPO connectors have a white dot on the body of the connector to indicate Fiber 1. Adapters also impact polarity by the placement of the key slot at the front and back of the adapter. Polarity A adapters are referred to as “key-up to key-down” and Polarity B adapters are referred to as “key-up to key-up.”
The TIA-568.3 standard provides three methods to configure systems to ensure that proper connections are made. Type A is a straight-through connection. The fiber in position 1 is connected to position 1. Type B is a flipped connection. The fiber in position 1 is connected to position 12. This causes a flip in the fibers, which you need to have a 40/100G transmitter talk to a 40/100G receiver. Type C configuration is a pairwise flip (fiber 1 to 2, fiber 2 to 1, etc.) used for systems where the end connections are duplex—typically to support 1/10G. Note there are also custom or proprietary polarities.
As you can imagine, polarity becomes challenging because of the range of options available. If you have four different cords and three adapters, it’s important to test and document the end-to-end polarity of a system because that’s what the equipment sees.
The illustration with the adapter shows an unpinned female connector, inside the adapter, connected to the ribbon fiber. When connected to the pinned male adapter (key down), the pins line up to create a physical connection for the light to travel through the fibers. This is the critical joining point in the fiber network. If there is no clean physical contact, the light path is disrupted and the connection is compromised.
Never try to mate two “female” MPOs (there will not be sufficient endface alignment for light to travel down the fibers) or two “male” MPOs (the pins colliding could damage the connection).
Inspect, clean, inspect
Before you connect MPO connectors, it is essential that all the fiber endfaces and the ferrule are clean—really clean. Lining up 12 or 24 fibers requires tremendous precision, especially when you consider that a singlemode fiber has a core only 9 microns in diameter. If there is any dirt in the mix on one of your fiber endfaces or on the ferrule, when you make the connection that piece of dirt will shatter and move all over the connector. The dirt creates air gaps that can prevent light from traveling down some of the fibers and will create back reflections and insertion loss on any fiber that’s affected.
Picture a scenario in which the above-referenced scenario takes place. Dirt and air gaps have compromised the first 7 of the 12 fibers in an MPO connector. In such a scenario, testing fibers 8 through 12 would show no problems; those fibers could be put into service. However, if you wanted to add traffic later to fibers 1, 2, 3, and 4, the tests would show too much loss or too much reflection, which would require taking apart the connector to clean it and dropping any traffic on the lower fibers.
To avoid this kind of problem, Viavi recommends the “Inspect Before You Connect” approach, a practice that is consistent with IEC standards.
The concept is simple: First inspect all the fiber endfaces. If the endface is not dirty, you’re good to go. If there’s any contamination, you clean it. Then you inspect it again. Always re-inspect because it’s the only way to know if your cleaning process was effective. Never connect until the fiber endface is clean. Never clean first; there’s no point in cleaning something that is already clean because you don’t want to touch that fiber endface more than necessary.
To ensure that the system is free of contamination, both sides of every connection must be clean. Patch cords are easy to access and view compared to the fiber inside the bulkhead, which is frequently overlooked. That’s typically because the installer doesn’t have the right tool, but it’s a mistake to skip it. The bulkhead side may only be half of the connection, but it is far more likely to be dirty and problematic.
The IEC 61300-3-35 standard sets the inspection requirements for connector quality. It applies to both simplex and MPO connectors, but with MPO connectors, only two zones matter: the core and the cladding.
Clickers are good for cleaning endfaces during network installations as they are effective for both cassettes and patch cords.
MPO connectors tend to be more prone to static buildup than simplex connectors. For this reason, using a wet-to-dry cleaning method is preferred.
Viavi recommends applying a small amount of cleaning fluid to an optical-grade wipe, then touching the cleaning tip of the clicker to the wet spot on the wipe. Never apply the cleaning fluid directly to the cleaning ribbon.
An adapter is used to connect an unpinned/female adapter (key up) with a pinned/male adapter (key down), ensuring the pins line up to create a physical connection.
What to test
When looking at an MPO system, it’s important to know what to test—and which test procedures to use.
Take another look at the illustration on page 40. In the first example, when using cassettes with LC connections on the front, Viavi recommends that installers make sure all connections are clean first by inspecting and, if necessary, cleaning the connector where the MPO plugs into the cassette and then testing the duplex drops in the front of that cassette. Testing the trunk cable is useful if there’s any kind of splice-on field connector. In situations where there is a factory-terminated fiber of a specific length and it’s been installed properly, it may not be necessary to test the MPO trunk itself.
In the second example, it’s important to check that the MPO connections are good at the cassettes and patch panels, and then test from the MPO to the simplex LC.
And in the third example you would inspect your MPO connections and then test the MPO links and/or channels.
Tier 1 testing
One of the main challenges in Tier 1 testing for MPOs is the one-cord reference. The test cord must match the gender of the receiver. As described earlier, MPO connectors can be either pinned or unpinned. Therefore, when using a test set with pinned ports on the power meter and the light source, an unpinned-to-unpinned test cord must be used to perform the one-cord reference.
Once the one-cord reference is performed, the cord is disconnected from the receiver and a receive cord is added. This is identical to the one-cord reference done with duplex optical loss test sets. However, the next step of verifying the reference presents a challenge because the ends of the launch and receive cords will have the same gender and cannot be connected. So to verify the reference, a third cord (and two adapters) needs to be added. The two connections make for additional loss when the reference is verified. Alternatively, MPO reference cords are available from some cabling vendors that allow the gender to be changed in the field, which eliminates the need for a third cord and the associated losses.
Tier 1 testing provides overall results on loss, length, and polarity but will not identify individual events. There are several configurations where Tier 1 tests are used.
MPO-to-MPO—The simplest Tier 1 test measures MPO connectivity. There is a tester/transmitter at one end and a tester/receiver on the other end. The test checks polarity and length based on your settings.
MPO-to-single-fiber loss and polarity test—This scenario uses an MPO source at one end and a simplex power meter at the other. This allows you to test from MPO to fanouts or cassettes, testing end-to-end channels for QSFP to 10G and fiber map from MPO to LC/SC.
Power levels (absolute power, rather than loss) can be tested using any MPO source and an MPO power meter.
Some 40G and 100G MPO systems don’t populate all the fibers in a connector. To prevent the test result from being adversely influenced by the unused fibers, it’s possible to select the channels to be tested. This eliminates false fails in cases where 8 or fewer fibers are present in MPO links (e.g. 40GBase-SR4). Channel selection can also be used in Tier 2 testing.
A light source/power meter is quite accurate for measuring end-to-end power. What it cannot do is make sure that individual event losses are within spec. That’s where Tier 2 testing comes in.
Tier 2 testing
Although it’s still viewed as supplemental testing, especially in North America, Tier 2 testing offers several insights not available in Tier 1. While Tier 1 tests ensure that overall losses are within the spec, Tier 2 testing provides data on individual splices and connections. This allows you to pinpoint any events that are potential issues and serves as a troubleshooting tool to find the cause and location of excess loss and reflectance. Tier 2 testing also tests whether cable attenuation is uniform.
Currently there are no OTDRs available with MPO ports, so to conduct Tier 2 testing on MPO connectors you must use either an external or internal switch.
External switch—In this scenario, a simplex OTDR is connected to the switch with a patch cord. A USB cable connects the OTDR cable to the switch. Once the test is initiated, the OTDR automatically steps through all 12 fibers, providing 24 individual traces; 12 at wavelength 1 (850/1310 nm) and 12 at wavelength 2 (1300/1550 nm), showing the characterization of all the individual losses along the way.
Internal switch—Although the OTDR does not have an MPO port, you can have two modules on the back; one is the OTDR and the other is the switch module. Simplex fiber runs between the two modules, but because the control is internal, there is no need for an external switch or a USB cable running that internal switch to your patch cable. The cable under test is in the same environment as with the external switch.
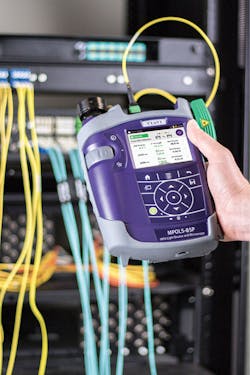
MPOLx series OLTS perform Tier 1 certification using MPO connectivity.
With cassettes, attenuation or event dead zones become critically important. Because a cassette is a single unit, finding out where the problem lies can save you considerable time and help prevent system downtime.
Conventional OTDRs show individual events but do not identify whether the event is in the front or the back of the connector. High-resolution OTDRs are available that can distinguish between the front and back connectors of a cassette. They won’t necessarily give you a 100-percent indication of loss between the front and the back connector but will show you the two separate events with the loss difference between them. This allows you to identify and fix a problem while avoiding unnecessary service interruptions. You don’t want to take the connector off the back of the fiber, especially if some of the fibers on that connector are in service. If ribbon connector (back) is damaged or dirty, maintenance of the connector/replacement can affect multiple fiber/services—and up to 10 other channels.
Takeaways
Parallel optics are here to stay, as are MPO connectors. Although MPOs can be more challenging to clean and test, the benefits of port density and a solid migration path make the extra care worthwhile. Look for evolving standards to provide guidance on installation and testing, but in the meantime keep the following points in mind.
- The most critical element to insuring quality MPO connections is endface condition. MPOs are a difficult connector to keep clean, but contamination on one or more fibers in a fiber array can have long-term impact.
- Polarity can be a challenge, especially when adapting existing MPO backbones to new services. Testing backbone polarity is key as it presents challenges for testing and referencing. Because test cords must mate with the system, be aware of key position and connector gender on all system elements.
- Be aware of pinned/unpinned and the associated challenges for testing.
- Keep testing appropriate. Tier 1 tests are typically performed on links while channel testing makes sense when using fanout cables or when adding new services.
- OTDR testing of MPO allows for characterization of the link or channel (uniformity of cable attenuation) as well as fault isolation to prevent unnecessary service interruptions.
Ed Gastle is product line manager for structured cabling test solutions with Viavi Solutions (www.viavisolutions.com).
